
how to create a faceless YouTube channel?
What if you could make money on YouTube, without ever showing your face. Kinda wild right?
In 2026, it’s not only possible. Like, 2.6 Billion of people are doing it every single day and yes they are getting paid from YouTube, without a camera, without pricey gear, and without recording their own voice. At all.
They call it a faceless YouTube channel , and honestly it might be one of the best routes to earn online right now.
The nice part is that AI tools make everything feel kinda effortless. You can put together your script, generate a voiceover, design the visuals, and even edit your video using free tools, all in under one hour.
So in this beginner friendly guide, you will learn how to create a faceless YouTube channel step by step.
What is a Faceless YouTube Channel, really?
A faceless YouTube channel is basically a YouTube channel where the creator never shows up on camera, like at all
Instead of recording yourself talking, you use other styles of material to share your message. That can mean screen recordings, stock footage, animated slides, and even AI generated voiceovers, depending on what you’re making
You’ve probably already seen faceless YouTube channels without noticing it. For example channels that simply present slides with a voiceover, animated explainer videos, or stock clips with narration are all faceless, in the simplest sense
A lot of these channels end up having hundreds of thousands of subscribers and make thousands of dollars each month. The people behind them keep distance, they never appear onscreen, and they don’t tell you who they are either
Why start a faceless YouTube channel?
There are a lot of solid reasons to go for a faceless YouTube channel in 2026 , and honestly it can make things easier.
You don’t have to be on camera. If you feel shy, or just kinda uncomfortable recording yourself, a faceless channel removes that issue completely, like its not even a thing.
You don’t need fancy or expensive equipment. No camera, no lights, no microphone. Really all you need is a laptop, plus free AI tools, and you can get going pretty fast.
You can earn real money. Faceless channels make income through YouTube ads, affiliate marketing and sponsorships. A bunch of creators hit something like $500 to $5,000 per month after six to twelve months of steady effort.
AI tools handle most of the work. In 2026, AI can help write your script, produce your voiceover, and guide your editing process. What used to take hours, now can take less than one hour.
It can turn into long-term income. Once a video is posted, it keeps bringing in revenue for months, even years, without you doing extra work every single time.
Free AI Tools You Need
You do not need to spend any money to start. Here are the best free tools available right now.
ChatGPT at chatgpt.com
Use this to write your video scripts, generate ideas, and create titles and descriptions. The free version works perfectly for beginners. visit website
ElevenLabs at elevenlabs.io
This is the best free AI voiceover tool. It creates realistic human sounding voices from your written text. You simply paste your script, and it generates professional audio. visit website
Canva at canva.com
Use this to create video slides, thumbnails, and channel artwork. The free version includes thousands of templates. visit website
CapCut at capcut.com
This is a free video editor for both mobile and desktop. Use it to combine your audio and visuals into a finished video. visit website
Pexels at pexels.com
This website offers completely free stock footage and images for your videos. visit website
Step by Step to how to create a faceless YouTube channel
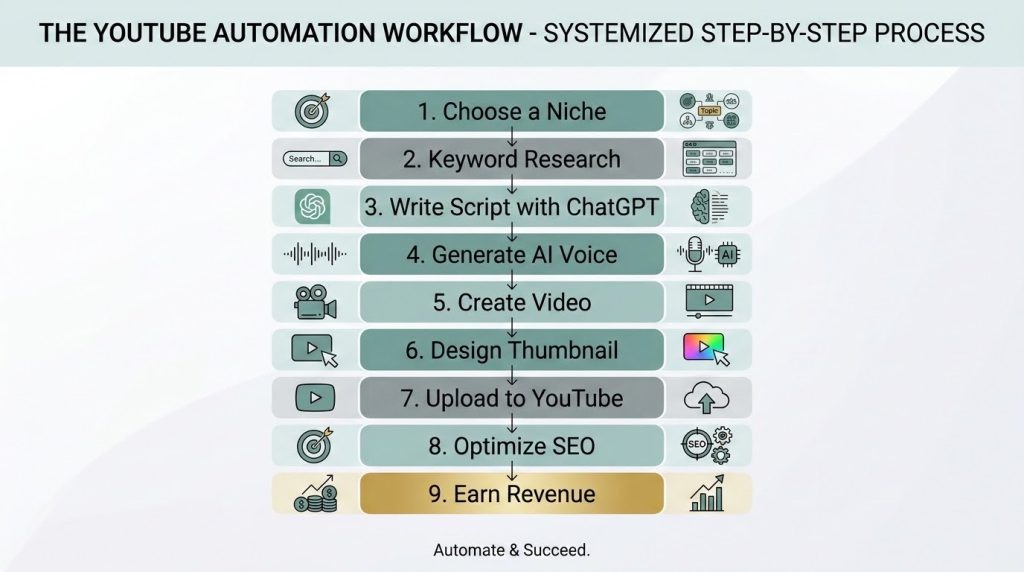
Step 1: Pick your niche
The most promising niches for faceless YouTube channels in 2026 are AI tools and technology, personal finance and money tips, self-improvement and motivation, health and fitness, business and side hustles, plus educational how-to content.
(Yeah, the list is long, but you don’t have to overthink it.)
Go with a niche you have at least some interests in, or knowledge about. That way, creating content regularly becomes way easier, not just in theory but in real life. If you enjoy learning about AI tools, build a channel around that. If you already know plenty about saving money, then start a finance channel.
If you want the best income potential, select a niche where audiences tend to spend money. Finance, technology, and business channels usually bring in the highest ad revenue on YouTube, so that’s a good direction to consider first.
Step 2: Set up your YouTube channel
Head to YouTube.com and sign in using your Google account. Then click your profile photo up in the top right corner and choose Create a Channel. Enter your channel name. If you get stuck, use ChatGPT, it can help. Just ask it for channel name ideas, that match your niche or topic, you know.
Once your channel is made, add a profile picture plus a banner image. Canva works great for this, really easy. Next write a channel description that explains what your channel covers and who it’s really for. Try to place your main keyword in the description naturally, so it doesn’t sound forced.
Step 3: Find Your Video Topic
Before you start writing your script, you need a solid video topic. But, like, it should be a thing people are already looking up on YouTube.
Go into the YouTube search bar and type your niche keyword. As you type, check the suggestions that pop up. Those suggestions are basically real searches that happen, like every day.
You can also use Ubersuggest, if you want something a bit more organized, for keyword finding. Try to spot keywords that have a Search Difficulty under 35 and a monthly volume over 100. These are the kinds of phrases a new channel can actually rank for without too much struggle.
Another pretty easy approach is using ChatGPT. Ask it to give you 20 video ideas for beginners in your niche, then pick the one that sounds the most engaging and helpful for your target audience.
Step 4: Write Your Script Using ChatGPT
Alright so, this part is basically the base of your whole video. If your script is good, the rest becomes a lot less messy, like editing becomes smoother and your talking point stays clear.
So, open up ChatGPT and use this prompt, it’s pretty straightforward, you can copy paste it.
“Write a friendly and easy to understand YouTube video script about [your topic]. The video should be around 8 minutes long when read aloud. Start with a strong opening that grabs attention in the first 30 seconds. Add clear sections with useful tips and real examples. End with a call-to-action asking viewers to subscribe. Write in a simple conversational tone that complete beginners can follow.”
Once ChatGPT gives you the script, don’t just hit save and move on. Read through it carefully, like actually go line by line. Make sure the facts are correct. And if something feels too generic, add your own personal thoughts or tiny real experiences, even a small story helps. The more you make it personal and specific, the better it usually performs, because people feel like, “oh this was made for me”.
After that, you’re ready to record.
Step 5: Create Your AI Voiceover
Once you re script is ready, head over to ElevenLabs and set up a free account.
Then, just browse through the voices they offer, and try to pick one that feels right for your channel vibe. You will see both male and female voices with different accents and speaking modes, so take a second, don’t rush. Choose something that sounds natural, but also fairly polished, professional.
Now, paste your script into the text box and hit Generate. Listen closely to the output. If any parts feel a bit odd, or like it’s doing weird phrasing, edit the wording slightly, and regenerate only those sections, instead of redoing everything.
When it sounds good, download the finished audio file, and save it on your computer. This AI narration will become the main audio track for your video.
Step 6: Gather your visuals
Your video kinda needs visuals so people stay engaged, or at least they don’t bounce right away. Here are the easiest ways to grab free visuals for your content.
First, go to Pexels and search for stock footage that matches what your video is about. So like, if your video is focused on making money online , search for clips showing someone working at a laptop or like celebrating a win. Download a few different clips, for separate parts of your video, so it feels less repetitive.
You can also build basic presentation slides using Canva. Make a set of neat slides that highlight the main ideas and details from your script. Try to keep the colors and fonts consistent, the same kind of style as your channel branding, because it looks more polished.
And if your video is a tutorial, or basically a how-to guide, then record your screen while you do the steps. This is honestly the simplest visual format to create, and it works really well for educational content.
Step 7: Edit Your Video Using CapCut
Open CapCut and start a brand new project. Import your voiceover audio and also all the visual files you plan to use.
Put the voiceover on the main audio track, then add your visuals above it on the timeline. Try to line up each visual with the part of the voiceover it relates to. When your voiceover mentions a specific tip, show a quick slide or b-roll footage that supports that exact tip, so it doesn’t feel random or mismatched.
Add background music but keep it at a low volume. This really helps your video sound more polished and a bit more pro, even if the content is simple. Use free tracks from the YouTube Audio Library so you can avoid copyright problems later on.
Now add subtitles using CapCut’s automatic caption feature. Click Generate Captions and CapCut will create subtitles directly from your audio. Subtitles matter a lot, because many people watch videos without sound, especially on their phones.
Once you’re happy with how it looks and sounds, export your video using the highest quality option available.
Step 8: Create Your Thumbnail
Your thumbnail is the picture people see before clicking your video. A strong thumbnail can meaningfully boost how many people actually choose to click, not just scroll past.
Open Canva and pick the YouTube Thumbnail template, it’s 1280 by 720 pixels. Use bold text that’s easy to read, and try to say the main payoff of your video in just a few words. Go with bright contrasting colors, so everything stands out at a glance. Also keep the overall layout clean and simple, don’t overcrowd it with too many elements.
Your thumbnail text should clearly explain what viewers will get. For example: Make Money Without Showing Your Face, or 5 Free AI Tools for YouTube , are both clear and convincing.
Step 9: Upload your Video to YouTube
Go to YouTube Studio and tap Create, then Upload Video. Pick your final, finished video file.
Write a title that’s actually strong and it should contain your main keyword in it. For the description, go detailed, like at least 200 words, not just a short blurb. Also, make sure your keyword shows up in the first two sentences of the description, otherwise it feels a bit off. If you mention any tools or resources in the video, add links to them right in the description, like the direct pages or official sites.
Add five to ten relevant tags, related to your whole video topic. Then upload your custom thumbnail (not the auto ones). Set the visibility to Public, and hit publish.
Step 10: Be consistent and patient
Okay this part is the most important step of all.
Almost every channel sees very small growth in the first two to three months, it’s normal and you should expect it. YouTube needs time to learn your channel, then it starts recommending your videos to the right viewers, not random people.
Try to upload at least one video per week , and don’t stop. Channels that stay steady for six to twelve months usually end up seeing real growth. But channels that quit after a few uploads, generally never get the results they want.
After a few weeks, check YouTube Analytics. Look for which videos are doing best, meaning more views and better watch time. Then create more videos on those same themes, the ones that are already gaining traction.
Common Mistakes Beginners Make
- Choosing too many niches
- Uploading random videos
- Ignoring thumbnails
- Using copyrighted music
- Not researching keywords
- Giving up after five videos
- Buying fake subscribers
- Never checking YouTube Analytics
How Long Does It Take to Make Money? 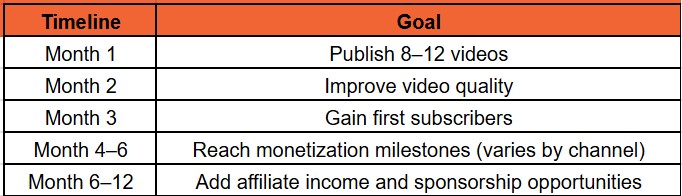 Note:Results vary for every creator.There is no guaranteed income timeline.
Conclusion
What you really need is just a free AI tool, a decent topic, and the willingness to create and upload videos on a regular basis, like every week.
The whole process feels pretty straightforward. Pick your niche, set up your channel, draft your script using ChatGPT, record the voiceover with ElevenLabs, then edit everything with CapCut. After that, upload it to YouTube, and yep… you just repeat the cycle again next week, and again the week after that.
Basically, the only thing between you and a profitable faceless YouTube channel is taking that first step right now, not later.
If this guide was useful, check out more articles on HustleAI Lab for the newest AI tools, quick side hustle ideas, and step by step plans for making money online in 2026.
Why Trust HustleAI Lab?
At HustleAI Lab, we research AI tools, automation workflows, and online business opportunities designed for beginners.
Our recommendations are based on hands-on evaluation of features, pricing, ease of use, and real-world creator workflows. Whenever possible, we test tools ourselves or compare them using official documentation and publicly available information so readers can make informed decisions.
About the Author
Sravan Chinni is the founder of HustleAI Lab, a blog that helps beginners earn money online using AI tools and side hustles. You can visit hustleailab.com for more free guides.